ChE 436: Temperature Control Lab
Main.PhysicalLab History
Show minor edits - Show changes to markup
(:html:)
 <div id="disqus_thread"></div>
    <script type="text/javascript">
        /* * * CONFIGURATION VARIABLES: EDIT BEFORE PASTING INTO YOUR WEBPAGE * * */
        var disqus_shortname = 'apmonitor'; // required: replace example with your forum shortname

        /* * * DON'T EDIT BELOW THIS LINE * * */
        (function() {
            var dsq = document.createElement('script'); dsq.type = 'text/javascript'; dsq.async = true;
            dsq.src = 'https://' + disqus_shortname + '.disqus.com/embed.js';
            (document.getElementsByTagName('head')[0] || document.getElementsByTagName('body')[0]).appendChild(dsq);
        })();
    </script>
    <noscript>Please enable JavaScript to view the <a href="https://disqus.com/?ref_noscript">comments powered by Disqus.</a></noscript>
    <a href="https://disqus.com" class="dsq-brlink">comments powered by <span class="logo-disqus">Disqus</span></a>
(:htmlend:)
(:html:) <table> <tr> <td> <a target="_blank" href="https://www.amazon.com/gp/product/B07GMFWMRY/ref=as_li_tl?ie=UTF8&camp=1789&creative=9325&creativeASIN=B07GMFWMRY&linkCode=as2&tag=apmonitor-20&linkId=240e25095dffdf5a68ecc98a1b707e2f"><img border="0" src="//ws-na.amazon-adsystem.com/widgets/q?_encoding=UTF8&MarketPlace=US&ASIN=B07GMFWMRY&ServiceVersion=20070822&ID=AsinImage&WS=1&Format=_SL250_&tag=apmonitor-20" ></a><img src="//ir-na.amazon-adsystem.com/e/ir?t=apmonitor-20&l=am2&o=1&a=B07GMFWMRY" width="1" height="1" border="0" alt="" style="border:none !important; margin:0px !important;" /> </td> <td> <iframe style="width:120px;height:240px;" marginwidth="0" marginheight="0" scrolling="no" frameborder="0" src="//ws-na.amazon-adsystem.com/widgets/q?ServiceVersion=20070822&OneJS=1&Operation=GetAdHtml&MarketPlace=US&source=ac&ref=tf_til&ad_type=product_link&tracking_id=apmonitor-20&marketplace=amazon®ion=US&placement=B07GMFWMRY&asins=B07GMFWMRY&linkId=ef7e3c8c25c02a504ef84d62a51f77d9&show_border=false&link_opens_in_new_window=true&price_color=333333&title_color=0066c0&bg_color=ffffff"> </iframe> </td> </tr> </table> (:htmlend:)
This lab is an application of feedback control for a temperature control device. Complete instructions are available below in the temperature control lab description. The lab can be run on personal computers or on workstations in the UO Lab. Kits are available for temporary use and should remain in the UO Lab. The lab files are intended for MATLAB 2013B and earlier. For the latest versions, see the new Temperature Control Lab.
This lab is an application of feedback control for a temperature control device. Complete instructions are available below in the temperature control lab description. The lab can be run on personal computers or on workstations in the UO Lab. Kits are available for temporary use and should remain in the UO Lab. The lab files are intended for MATLAB 2013B and earlier. For the latest versions, see the new Temperature Control Lab.
This lab is an application of feedback control for a temperature control device. Complete instructions are available below in the temperature control lab description. The lab can be run on personal computers or on workstations in the UO Lab. Kits are available for temporary use and should remain in the UO Lab.
This lab is an application of feedback control for a temperature control device. Complete instructions are available below in the temperature control lab description. The lab can be run on personal computers or on workstations in the UO Lab. Kits are available for temporary use and should remain in the UO Lab. The lab files are intended for MATLAB 2013B and earlier. For the latest versions, see the new Temperature Control Lab.
(:htmlend:)
MIMO (Multiple Input / Multiple Output) Version
- Temperature Control Lab Files (MIMO)
- Model Predictive Control Lab
(:html:) <iframe width="560" height="315" src="https://www.youtube.com/embed/sj-Ld-mxZoU" frameborder="0" allowfullscreen></iframe>
Solve and Linearize a Energy Balance Model with MATLAB
Solve and Linearize an Energy Balance Model with MATLAB
Featured in CACHE News, December 2014.
Featured in CACHE News, December 2014.
- Featured in CACHE News, December 2014.
Featured in CACHE News, December 2014.
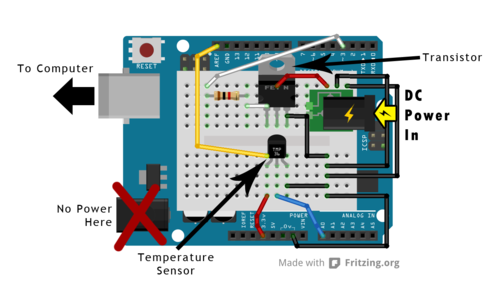
The three important elements for a control loop are the measurement device (thermistor), an actuator (voltage), and capability to perform computerized control (USB interface).
The three important elements for a control loop are the measurement device (thermistor temperature sensor), an actuator (voltage to the transistor), and capability to perform computerized control (USB interface). At maximum output the transistor dissipates 3.1 W of power with a voltage of 8.9 V and current of 0.35 A. The heat generated by the transistor transfers by radiation, convection, and conduction to the temperature sensor.
(:htmlend:)
Fundamental Model Derivation Help Session
(:html:) <iframe width="560" height="315" src="//www.youtube.com/embed/dhV6yGh-iwU" frameborder="0" allowfullscreen></iframe>
(:htmlend:)
Solve and Linearize a Energy Balance Model with MATLAB
(:html:) <iframe width="560" height="315" src="//www.youtube.com/embed/w9gwRFCbgNA" frameborder="0" allowfullscreen></iframe>
(:htmlend:)
Root Locus Stability Analysis
(:html:) <iframe width="560" height="315" src="//www.youtube.com/embed/YpbsNQqXQjU" frameborder="0" allowfullscreen></iframe>
Stability Analysis and PID Tuning in Simulink
(:html:) <iframe width="560" height="315" src="//www.youtube.com/embed/YvZICTtMFBc" frameborder="0" allowfullscreen></iframe> (:htmlend:)
Temperature Control
MATLAB / Arduino Temperature Control Lab
(:html:) <iframe width="560" height="315" src="//www.youtube.com/embed/nn2qgYykdy0?rel=0" frameborder="0" allowfullscreen></iframe> (:htmlend:)
This lab is an application of feedback control for a temperature control device. Complete instructions are available below in the temperature control lab description. The lab can be run on computers in the UO Lab and kits are available for temporary use.
This lab is an application of feedback control for a temperature control device. Complete instructions are available below in the temperature control lab description. The lab can be run on personal computers or on workstations in the UO Lab. Kits are available for temporary use and should remain in the UO Lab.
Temperature Model Derivation
(:html:) <iframe width="560" height="315" src="//www.youtube.com/embed/dhV6yGh-iwU" frameborder="0" allowfullscreen></iframe> (:htmlend:)
The three important elements for a control loop are the measurement device (thermistor), an actuator (voltage), and capability to perform computerized control (USB interface). Watch the video above to receive instructions on how to build and operate the device.
The three important elements for a control loop are the measurement device (thermistor), an actuator (voltage), and capability to perform computerized control (USB interface).
Fundamental Model Derivation Help Session
(:html:) <iframe width="560" height="315" src="//www.youtube.com/embed/dhV6yGh-iwU" frameborder="0" allowfullscreen></iframe> (:htmlend:)
This lab is an application of feedback control for a temperature control device. Complete instructions are available below in the temperature control lab description. The lab can be run from Windows on computers in the UO Lab.
This lab is an application of feedback control for a temperature control device. Complete instructions are available below in the temperature control lab description. The lab can be run on computers in the UO Lab and kits are available for temporary use.
- Executive Summary
- Temperature Control Lab Grading Sheet
- Maximum length of 2 pages
- First Principles Modeling
- Empirical Modeling
Running the Arduino Temperature Control Module (Linux LiveUSB)
(:html:) <iframe width="560" height="315" src="//www.youtube.com/embed/JEB0M2RqWJ8?rel=0" frameborder="0" allowfullscreen></iframe> (:htmlend:)
Running the Lab - All Steps
- Download the "image" of Linux, Ubuntu, and all files you will need. To download these files, click on Download LiveUSB Image Files (1.6 GB).
- "Restore" the image to a flash drive. Open folder "usbit". Open "USB Image Tool". Select the Flash drive on the left and click "Restore". Then, select the file "Arduino Image." This may take about 5 minutes. You need to do this to the otherwise blank flash drive provided with the kit.
- Boot Ubuntu on your laptop. Restart your computer. While the computer is booting, press the appropriate key as displayed during startup to enter a "boot options" or "boot setup" (every computer is a little different). Then choose to boot the computer from the flash drive. After booting, choose "Try Ubuntu." In "Try Ubuntu" mode, the Linux operating system is run entirely from the USB drive instead of the computer's built-in hard drive.
- Upload code to the Arduino. You should see the Ubuntu desktop in front of you. Open "1 - Arduino." Then, double click on "arduino" and select "run" not "run in terminal." Then, click on "File " and the top of the new window and open Arduinojavacode/ArduinoJavaCode.ino. Then click "Upload."
- Gain Control of the arduino. Open "2 - Processing" on the desktop. Then open "processing" and select "run." Then open "Desktop/3 - PID_Controller/PID_Controller/PID_Controller.pde." Then click "run." You should then be seeing the controller output and temperature measurement of your arduino being graphed in real time.
- Systems Check. Many groups have been having trouble at this point. Check the wiring of your Arduino. Your resistor should be 1000 Ohms. Also, be sure you have plugged the power into the correct port. Many groups have this wrong.
- Manual Control Steps and Automatic Control Setpoint changes. To get the Arduino to respond, you will need to change one of the appropriate boxes and then immediately click "Send to Arduino." Do not hit enter. Then, toggle the control from manual to control and back, or visa versa. If this is confusing, watch the video or talk to a TA. Do step tests in manual control. You can later enter controller constants, put the Arudino in automatic control, and see how it responds to set point changes.
Other process control labs for this course may include measurement and control of pressure, level, temperature, concentration, etc. Below is a list of other optional lab activities and instructions.
(:description Tutorial on Temperature Control with a Simple Benchtop Lab with an Arduino Board:)
(:description Tutorial on Temperature Control with an Arduino Device:)
This lab is an application of feedback control on a benchtop temperature control device. Complete instructions are available below in the temperature control lab description. The lab can be run from Windows, MacOS, Linux platforms. Several programming languages can be used including Java, Matlab, or Python. Instructions are provided for Windows and Linux platforms. The simplest way to use the lab is to boot from a LiveUSB drive included with the lab equipment.
This lab is an application of feedback control for a temperature control device. Complete instructions are available below in the temperature control lab description. The lab can be run from Windows on computers in the UO Lab.
Restore LiveUSB Image to run Ubuntu Linux from USB drive
- Download LiveUSB Image Files (1.6 GB)
(:html:) <iframe width="560" height="315" src="//www.youtube.com/embed/flgVsuLS5Xc?rel=0" frameborder="0" allowfullscreen></iframe> (:htmlend:)
Instructions for Python and Java on Windows or MacOS (alternative method)
- Download Arduino Software
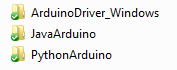
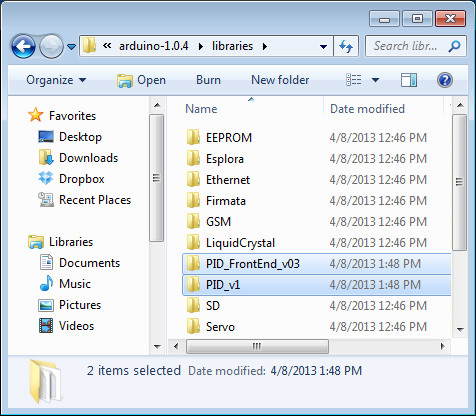
- Dowload Arduino PID Files and unzip into Arduino folder
Building the Arduino Temperature Control Module
(:html:) <iframe width="560" height="315" src="https://www.youtube.com/embed/J1-tzQtqifU?rel=0" frameborder="0" allowfullscreen></iframe> (:htmlend:)
Note: The instructional video is using a slightly larger breadboard to illustrate the wiring on the Arduino board. A smaller breadboard for the lab exercise is actually attached to the top of the Arduino board.
Temperature Model Derivation
(:html:) <iframe width="560" height="315" src="//www.youtube.com/embed/dhV6yGh-iwU" frameborder="0" allowfullscreen></iframe> (:htmlend:)
- Temperature Control Lab Grading Sheet - Maximum length of 2 pages
- Executive Summary
- Temperature Control Lab Grading Sheet
- Maximum length of 2 pages
- Empirical Modeling
- First Principles Modeling
WARNING: On bootup, select "Try Ubuntu" instead of "Install Ubuntu". In "Try Ubuntu" mode, the Linux operating system is run entirely from the USB drive instead of the computer's built-in hard drive.
Running the Lab - All Steps
- Download the "image" of Linux, Ubuntu, and all files you will need. To download these files, click on Download LiveUSB Image Files (1.6 GB).
- "Restore" the image to a flash drive. Open folder "usbit". Open "USB Image Tool". Select the Flash drive on the left and click "Restore". Then, select the file "Arduino Image." This may take about 5 minutes. You need to do this to the otherwise blank flash drive provided with the kit.
- Boot Ubuntu on your laptop. Restart your computer. While the computer is booting, press the appropriate key as displayed during startup to enter a "boot options" or "boot setup" (every computer is a little different). Then choose to boot the computer from the flash drive. After booting, choose "Try Ubuntu." In "Try Ubuntu" mode, the Linux operating system is run entirely from the USB drive instead of the computer's built-in hard drive.
- Upload code to the Arduino. You should see the Ubuntu desktop in front of you. Open "1 - Arduino." Then, double click on "arduino" and select "run" not "run in terminal." Then, click on "File " and the top of the new window and open Arduinojavacode/ArduinoJavaCode.ino. Then click "Upload."
- Gain Control of the arduino. Open "2 - Processing" on the desktop. Then open "processing" and select "run." Then open "Desktop/3 - PID_Controller/PID_Controller/PID_Controller.pde." Then click "run." You should then be seeing the controller output and temperature measurement of your arduino being graphed in real time.
- Systems Check. Many groups have been having trouble at this point. Check the wiring of your Arduino. Your resistor should be 1000 Ohms. Also, be sure you have plugged the power into the correct port. Many groups have this wrong.
- Manual Control Steps and Automatic Control Setpoint changes. To get the Arduino to respond, you will need to change one of the appropriate boxes and then immediately click "Send to Arduino." Do not hit enter. Then, toggle the control from manual to control and back, or visa versa. If this is confusing, watch the video or talk to a TA. Do step tests in manual control. You can later enter controller constants, put the Arudino in automatic control, and see how it responds to set point changes.
Instructions for Python and Java on Windows
Instructions for Python and Java on Windows or MacOS (alternative method)
- Download LiveUSB Image Files
- Download LiveUSB Image Files (1.6 GB)
Restore LiveUSB Image to run Ubuntu Linux from USB drive
(:html:) <iframe width="560" height="315" src="//www.youtube.com/embed/flgVsuLS5Xc?rel=0" frameborder="0" allowfullscreen></iframe> (:htmlend:)
Note: The instructional video is using a slightly larger breadboard to illustrate the wiring on the Arduino board. A smaller breadboard for the lab exercise is actually attached to the top of the Arduino board.
This lab is an application of feedback control on a benchtop temperature control device. Complete instructions are available below in the temperature control lab description.
This lab is an application of feedback control on a benchtop temperature control device. Complete instructions are available below in the temperature control lab description. The lab can be run from Windows, MacOS, Linux platforms. Several programming languages can be used including Java, Matlab, or Python. Instructions are provided for Windows and Linux platforms. The simplest way to use the lab is to boot from a LiveUSB drive included with the lab equipment.
Instructions for Python and Java on Windows
Running the Arduino Temperature Control Module (LiveUSB)
Running the Arduino Temperature Control Module (Linux LiveUSB)
WARNING: On bootup, select "Try Ubuntu" instead of "Install Ubuntu". In "Try Ubuntu" mode, the Linux operating system is run entirely from the USB drive instead of the computer's built-in hard drive.
<iframe width="640" height="360" src="https://www.youtube.com/embed/J1-tzQtqifU?rel=0" frameborder="0" allowfullscreen></iframe>
<iframe width="560" height="315" src="https://www.youtube.com/embed/J1-tzQtqifU?rel=0" frameborder="0" allowfullscreen></iframe>
<iframe width="640" height="360" src="//www.youtube.com/embed/JEB0M2RqWJ8?rel=0" frameborder="0" allowfullscreen></iframe>
<iframe width="560" height="315" src="//www.youtube.com/embed/JEB0M2RqWJ8?rel=0" frameborder="0" allowfullscreen></iframe>
<iframe width="480" height="360" src="//www.youtube.com/embed/JEB0M2RqWJ8?rel=0" frameborder="0" allowfullscreen></iframe>
<iframe width="640" height="360" src="//www.youtube.com/embed/JEB0M2RqWJ8?rel=0" frameborder="0" allowfullscreen></iframe>
<iframe width="640" height="360" src="https://youtu.be/JEB0M2RqWJ8" frameborder="0" allowfullscreen></iframe>
<iframe width="480" height="360" src="//www.youtube.com/embed/JEB0M2RqWJ8?rel=0" frameborder="0" allowfullscreen></iframe>
(:htmlend:)
Running the Arduino Temperature Control Module (LiveUSB)
(:html:) <iframe width="640" height="360" src="https://youtu.be/JEB0M2RqWJ8" frameborder="0" allowfullscreen></iframe>
Temperature Control
Temperature Control
Building the Arduino Temperature Control Module
- Dowload Arduino PID Files and unzip into Arduino folder
The open-source Arduino environment makes it easy to write code and upload it to the i/o board. It runs on Windows, Mac OS X, and Linux. The environment is written in Java and based on Processing, avr-gcc, and other open source software.
- Download Arduino Software
The open-source Arduino environment makes it easy to write code and upload it to the i/o board. It runs on Windows, Mac OS X, and Linux. The environment is written in Java and based on Processing, avr-gcc, and other open source software.
This lab is an application of feedback control to a benchtop temperature control device. Complete instructions are available below in the temperature control lab description.
This lab is an application of feedback control on a benchtop temperature control device. Complete instructions are available below in the temperature control lab description.
(:html:) <iframe width="640" height="360" src="https://www.youtube.com/embed/J1-tzQtqifU?rel=0" frameborder="0" allowfullscreen></iframe> (:htmlend:)
The three important elements for a control loop are the measurement device (thermistor), an actuator (voltage), and capability to perform computerized control (USB interface). Watch the video below to receive instructions on how to build and operate the device.
(:html:) <iframe width="640" height="360" src="https://www.youtube.com/embed/J1-tzQtqifU?rel=0" frameborder="0" allowfullscreen></iframe> (:htmlend:)
The three important elements for a control loop are the measurement device (thermistor), an actuator (voltage), and capability to perform computerized control (USB interface). Watch the video above to receive instructions on how to build and operate the device.
This lab is an application of feedback control to a benchtop temperature control device. Students have an opportunity to use this lab throughout the semester to learn principles of:
This lab is an application of feedback control to a benchtop temperature control device. Complete instructions are available below in the temperature control lab description.
Temperature Control Lab Description
Students have an opportunity to use this lab throughout the semester to learn principles of system dynamics and control. In particular, this lab reinforces:
(:html:)
 <div id="disqus_thread"></div>
    <script type="text/javascript">
        /* * * CONFIGURATION VARIABLES: EDIT BEFORE PASTING INTO YOUR WEBPAGE * * */
        var disqus_shortname = 'apmonitor'; // required: replace example with your forum shortname

        /* * * DON'T EDIT BELOW THIS LINE * * */
        (function() {
            var dsq = document.createElement('script'); dsq.type = 'text/javascript'; dsq.async = true;
            dsq.src = 'https://' + disqus_shortname + '.disqus.com/embed.js';
            (document.getElementsByTagName('head')[0] || document.getElementsByTagName('body')[0]).appendChild(dsq);
        })();
    </script>
    <noscript>Please enable JavaScript to view the <a href="https://disqus.com/?ref_noscript">comments powered by Disqus.</a></noscript>
    <a href="https://disqus.com" class="dsq-brlink">comments powered by <span class="logo-disqus">Disqus</span></a>
(:htmlend:)
(:title ChE 436: Physical Labs:) (:keywords nonlinear, model, predictive control, differential, algebraic, modeling language, process control course:) (:description Process Control and Dynamics Labs in Chemical Engineering at Brigham Young University:)
Lab 1: Physical System
Project #1 is an application of feedback control to a physical system. This may include measurement and control of pressure, level, temperature, concentration, etc. The three important elements for this project are that the system has a measurement device, an actuator, and capability to perform computerized control. Below is a list of pre-defined instructions for each of the 4 labs.
(:title ChE 436: Temperature Control Lab:) (:keywords Arduino, PID, temperature, control, process control, course:) (:description Tutorial on Temperature Control with a Simple Benchtop Lab with an Arduino Board:)
Temperature Control
This lab is an application of feedback control to a benchtop temperature control device. Students have an opportunity to use this lab throughout the semester to learn principles of:
- The difference between manual and automatic control
- Step tests to generate dynamic data
- Fitting dynamic data to build a simple First Order Plus Deadtime (FOPDT) model
- Obtaining parameters for a PID control from standard tuning rules
- Tuning the PID controller to improve performance
- Stability analysis
- Dynamic modeling with first principles
- Dynamic data reconciliation
- Model Predictive Control
The three important elements for a control loop are the measurement device (thermistor), an actuator (voltage), and capability to perform computerized control (USB interface). Watch the video below to receive instructions on how to build and operate the device.
(:html:) <iframe width="640" height="360" src="https://www.youtube.com/embed/J1-tzQtqifU?rel=0" frameborder="0" allowfullscreen></iframe> (:htmlend:)
Other process control labs for this course may include measurement and control of pressure, level, temperature, concentration, etc. Below is a list of other optional lab activities and instructions.
(:title ChE 436: Physical Labs:) (:keywords nonlinear, model, predictive control, differential, algebraic, modeling language, process control course:) (:description Process Control and Dynamics Labs in Chemical Engineering at Brigham Young University:)
Lab 1: Physical System
Project #1 is an application of feedback control to a physical system. This may include measurement and control of pressure, level, temperature, concentration, etc. The three important elements for this project are that the system has a measurement device, an actuator, and capability to perform computerized control. Below is a list of pre-defined instructions for each of the 4 labs.
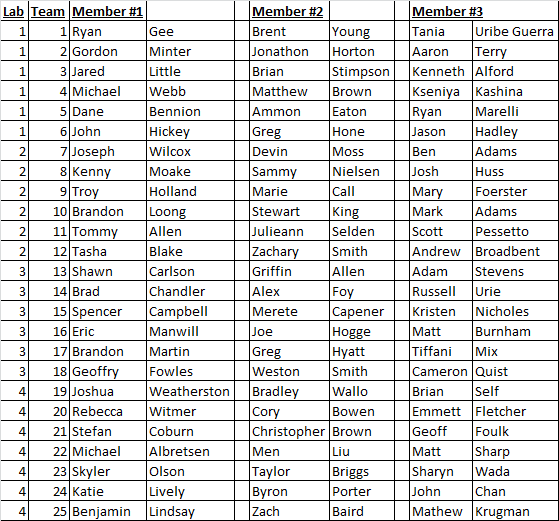
Groups for Project #1
